| Cement Block Rock Sculpture |
| Allen Bukoff and Janice Putman Bukoff |
|
| |
| One of 14 final (so far) cement and rock block sculptures we created. |
|
...where it began and where it led us |
Janice and I went on a ski trip to Sundance, Utah…..the art community/retreat built by Robert Redford. The first night after dinner, we were exploring one of the main buildings where the restaurants and stores were housed and we ran across a striking cement wall in one of the corridors: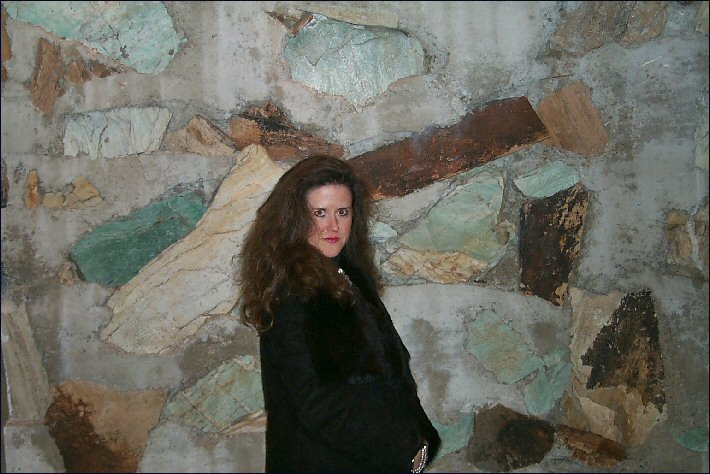
The wall in the background is unlike most stone & cement walls: there is as much or more cement than stone, the stones are laid irregularly AND-although it's hard to see in this picture--the faces of the stones are recessed several or more inches into the cement. Most stone walls are the opposite: more stone than cement with cement used as mortar between the stones, and stones sticking out. Janice and I were immediately very taken with this wall. We stopped and took pictures of it. We inspected it very closely. "How did they pour this wall and manage to make the rocks recessed?" We talked about how cool it was. We liked the turquoise and brownish colors of the rocks. We asked ourselves "why are we so infatuated with this wall?' Unlike a stone wall where there is cement used to hold the stones together and to build up the wall, this wall had obviously been poured in a form and somehow the mostly flat rock facings managed to be recessed…the cement hadn't been chipped away to reveal the rocks, it was like somehow they had created air pockets over the faces of the recessed stones. We kept talking about this wall and revisiting it over the next couple of days. We also discovered that this wall was not unique. There are a number of bridges & chimneys and other cement work throughout the Sundance retreat that have been made like this. It's part of what gives Sundance its "look." 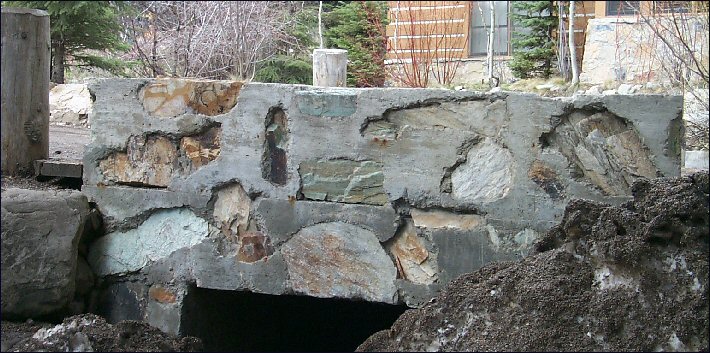
Each new cement-wall-with-rocks we discovered knocked us out and inspired us, again. Somewhere during those couple of days we started talking about how cool it would be for US to make a wall like this (in the dream house we'd love to build on the California coast in Big Sur) or a whole house like this, or maybe just a large backyard sculpture. |
As part of our Sundance experience we signed up for a one-session ceramics art class. My project was making a clay slab that would have rocks embedded in it. I thought this would be a nice souvenir of our Sundance-wall infatuation and a beginning attempt to start playing with rocks and walls. Janice and I picked up small rocks around Sundance before the class. I made a square clay slab, and then pushed the rocks into the slab to make impressions for the rocks. I couldn't leave the rocks in the clay because they might explode in the kiln, so I numbered each rock with a pencil and made a careful little map of how they were to be arranged. 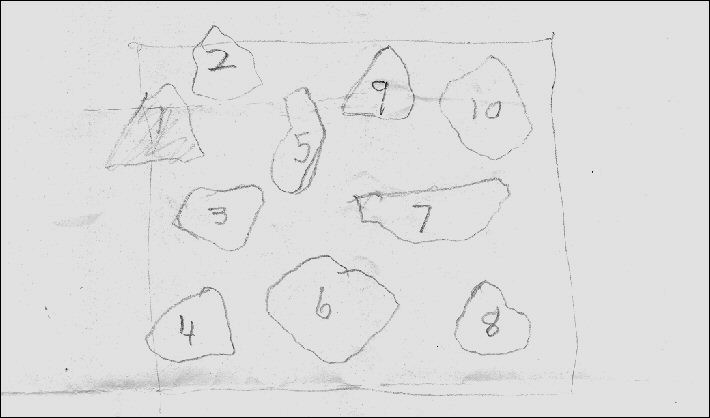
I removed the rocks, took them home with me, and then waited for the fired clay slab to arrive in the mail. Our first "rock wall." 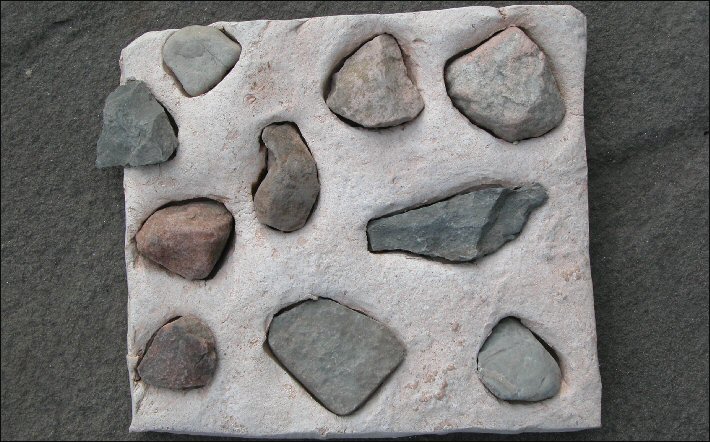
|
| Our first cement sculpture. |
Janice and I kept talking and fantasizing about making these rock walls/sculptures. It felt like a calling. We eventually had this idea that maybe we could begin by making smaller "walls." This could get us started, teach us some of the techniques we would need, and give us some experience working with rocks and cement. So I started thinking about making a small wooden frame that we could use to make a few small experimental cement models. We didn't get around to making our first cement "wall" (block) until August 13, 2001. I made a wooden frame in Janice's Dad's little shop and the next day we mixed our first tub of cement. We had already been collecting small rocks to use and had a nice selection on hand.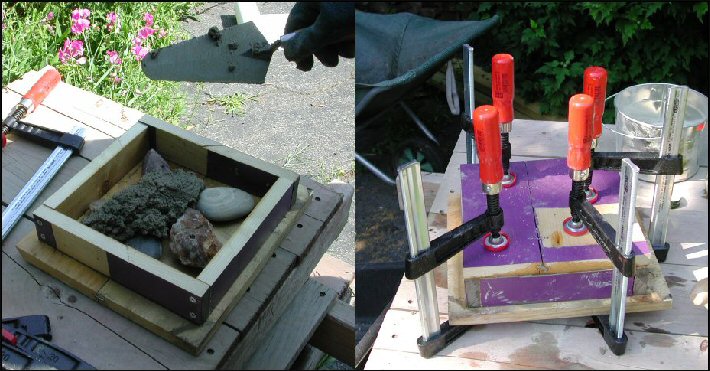
We figured that the wooden frame needed to be designed to firmly hold the cement and rock mixture together while it hardened and then easily come apart to remove the cement and rock block. We used a combination of screws and clamps to do this. The sides of our square wooden frame were designed to be held together by screws. Two large flat boards served as the front and back (or top and bottom) covers for the frame. These covers were loose (not connected to the frame by screws) but were pressed down hard on the frame using hand clamps that we bought at Home Depot--where we also got our bag of dry cement and a plastic tub and cowl to mix the cement in. Janice and I think the wooden forms with clamps attached are pretty cool and "arty" and we liked the look of this contraption sitting in our drive way on a larger platform or pedestal of stacked wooden pallets. At first we joked about how these wooden/clamp contraptions are cooler and perhaps an even more serious artistic object that the cement blocks they are being used to create. We decided to keep our focus on creating cement and rock blocks but believe these wooden/clamp contraptions are another creative possibility or path for us to pursue in the future. 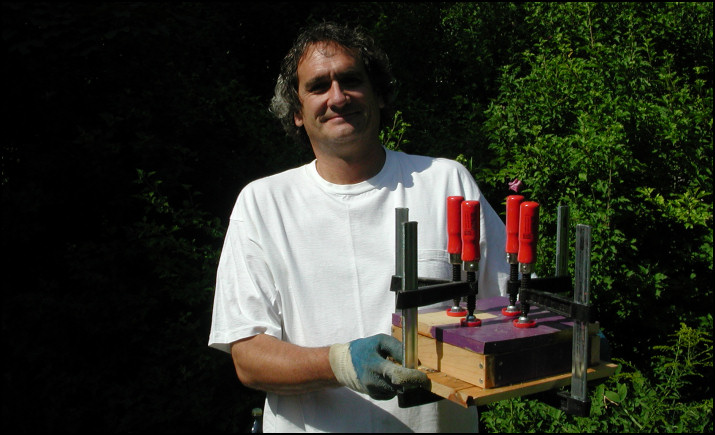 (Pride goeth before a fall.)
After putting our first cement and rock mixture in its frame, we left it for a few days to let the wet cement harden. While waiting for the cement to set, we sent out an email to family and friends with the following declaration:
We waited a few days for the cement to set, then we removed the vices, unscrewed the wooden frame, and released our first cement wall/block. It was basically a failure--for the following reasons: there was nothing particularly interesting or distinctive about it (it looked like a bunch of rocks stuck in cement). We didn't even bother to take a picture of it at the time and have lost track of it since then. There was nothing that looked or felt like the Sundance walls that had inspired us. We decided it failed because the rocks weren't recessed into the cement. We hadn't recessed them in the cement because we didn't really know how to do that! We were just hoping that it would look okay or interesting enough, anyway. It didn't. We now knew we had to figure out a way to create recesses or gaps in wet cement! |
| Breaththrough #1! |
|
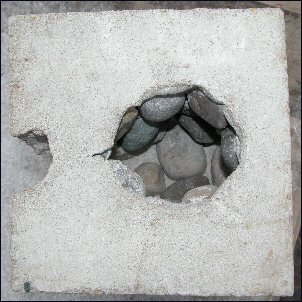
After studying our first "failed" cement sculpture we had an insight--we realized we needed to use something temporary and removable that could cover the rocks and inset them into the cement. This "covering" would then be removed after the cement block was hardened and removed from the frame. Wax and clay came to mind as possible materials. Both would be easily shaped and worked with, would stick to the rock & could be then be removed (by melting it out or by scraping it out by hand) to hopefully create the recessed gaps we were looking for. We decided to try clay thinking it would be easier to work with and remove than wax.
It worked! We used clay to recess the rocks and then let the clay dry out after the hardened cement had been removed from the frame. When the dried clay was cleared off the rocks, the block looked great and was close to our vision of the Sundance walls. 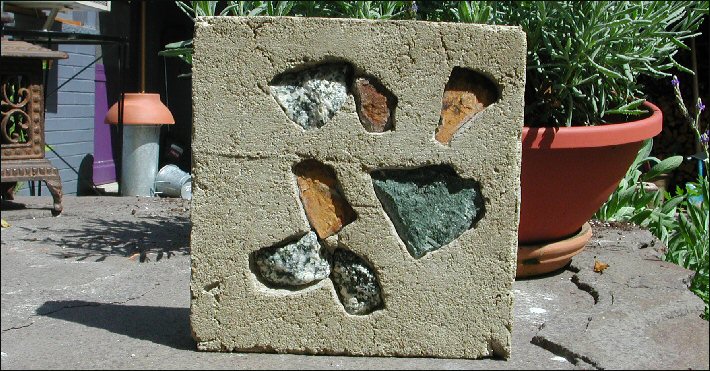 Sculpture #2
|
| More Experimentation |
So we started to experiment. With different types of cement. With a longer, more rectangular form. With different types of rocks. Janice tends to favor gemstones and I tend to favor plain rocks.
Some of the sculptures we created before it got too cold to continue working outside. 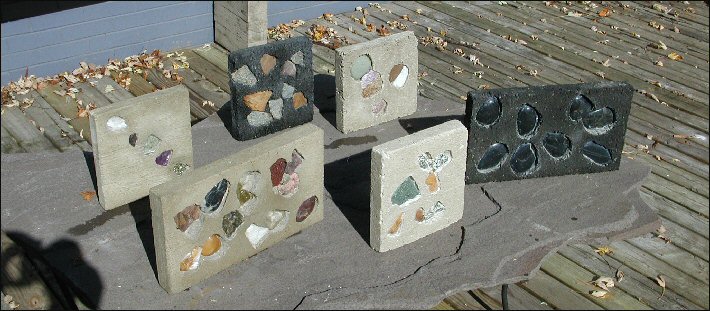 We spent the winter thinking and talking about these sculptures--what we liked and didn't like--and made plans to continue our creative journey the following summer. |
| |
| Breaththrough #2! |
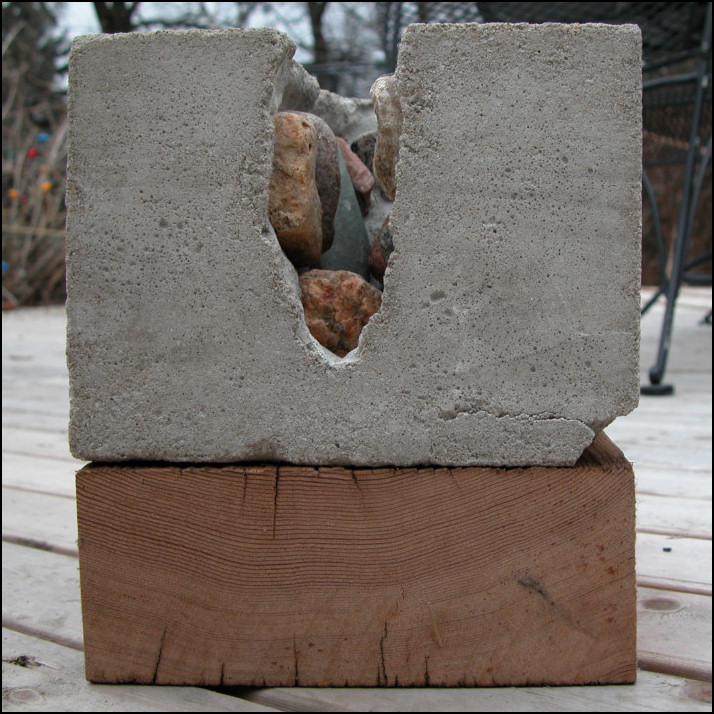
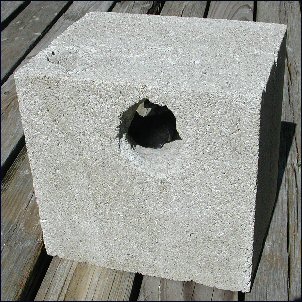
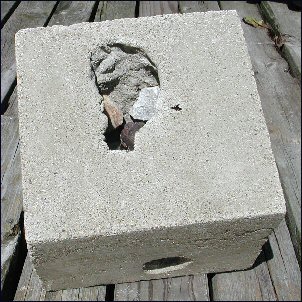
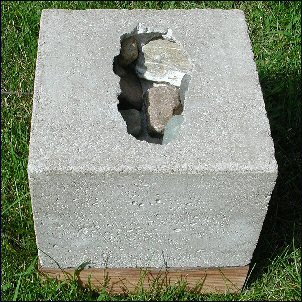
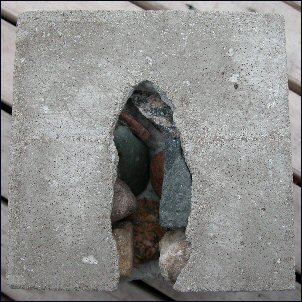
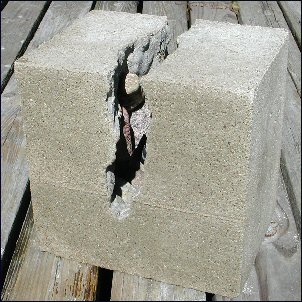
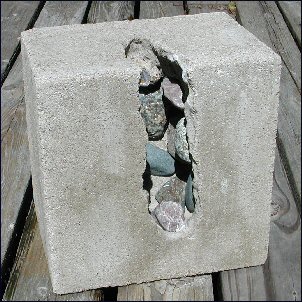
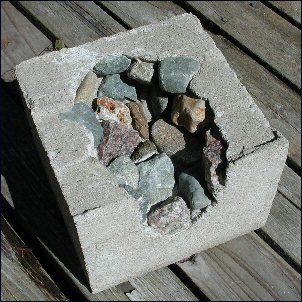
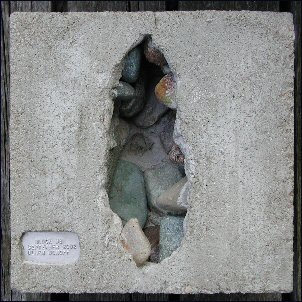
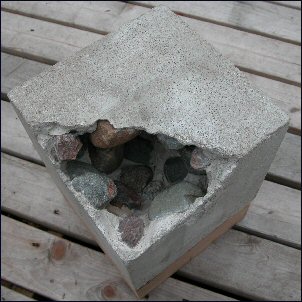
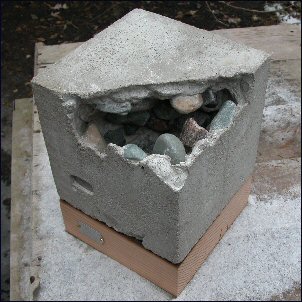
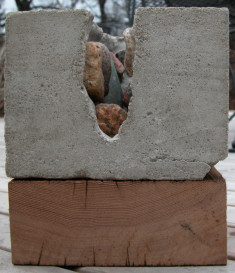
At the beginning of the second season we experimented with adding a hole and a "cut out"--a hole that overlapped one of the edges. We had realized that we could use the clay to not only create open recesses for the rocks, but to also create holes, tunnels, and other crevices and recesses in the cement blocks. We tried it out on the first sculpture we made in June.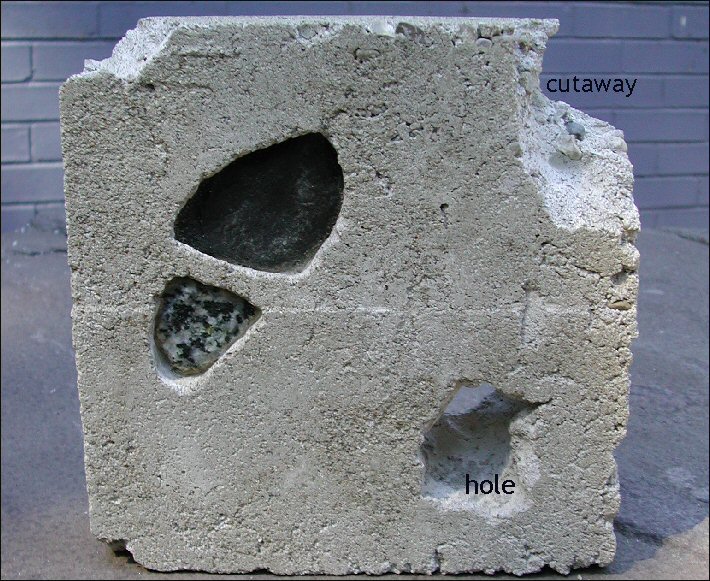 We liked the effect although it was less interesting and less radical looking than we had hoped. After this first block we started thinking that creating holes or tunnels would have greater possibilities if we were doing them in thicker (or wider) blocks of cement. If the blocks were thicker, we could not only make tunnels but we could imagine placing rocks inside the block in the walls of these tunnels. In our minds eye it seemed like it could be an interesting effect--like that offered by a geode rock. So we went back to Janice's Dad's shop and created a new wooden form for making our cement sculptures. This wooden form was much wider and produced a more cube like cement block. We also had to learn to backwards design and visualize making our clay tunnels and crevices with their internal protruding rocks. We would make a tube of clay and then stick rocks into the clay tube. We would position this in the wooden form and then scoop in the cement around the tube. How the rocks looked sticking out of the clay tube was the opposite of how they would look once the clay had dried and been removed. 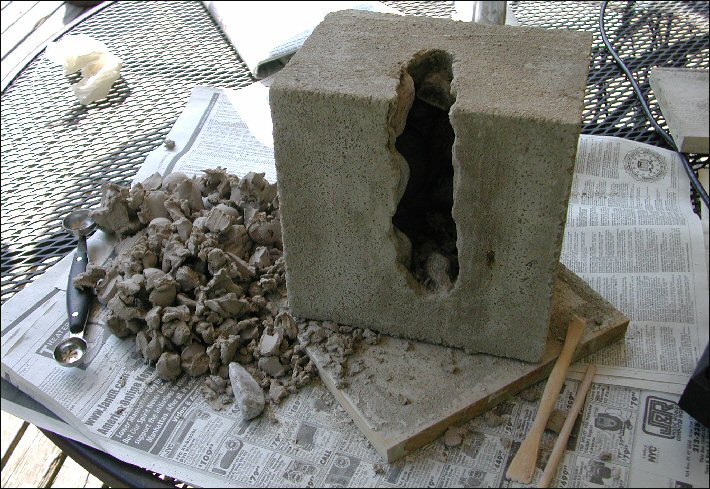 Here's an example of us scooping clay (either dried or still somewhat moist) out of one of our cement blocks. Scooping the clay out to reveal the tunnel or cavern of rocks within was a new task we had to learn and master. We found that using a melon-ball scoop worked well to remove the center of the clay tunnel. We then found that using wooden sticks (some with chisel like edges and some with points) were the best tools for removing the clay from the rocks and the cement tunnel walls. We couldn't always get at every little nook and cranny where the clay was, so the final step was letting the clay completely dry out and then using a strong jet of water from our garden hose to hose out the tunnel or cavern. This usually removed the remaining dried clay--although it sometimes loosened or removed one of the rocks, too. Learning how much a rock had to be embedded in the cement and how much could stick out into the clay/tunnel seems to depend on the type of rock (especially the smoothness of its surface), and its size, shape, and juxtaposition to other rocks. We found that we had to stick the rocks into the clay tunnel far enough so that they would hold and stay put while we filled up the form with cement. If they stuck too far and too solidly into the clay tunnel, however, then these rocks risked falling out of the cement once the clay was removed. We got better at doing this (visualizing the rocks sticking into the clay and then reverse visualizing them sticking out of the cement into the empty tunnel) as we proceeded, but this is the kind of skill we may never completely master.
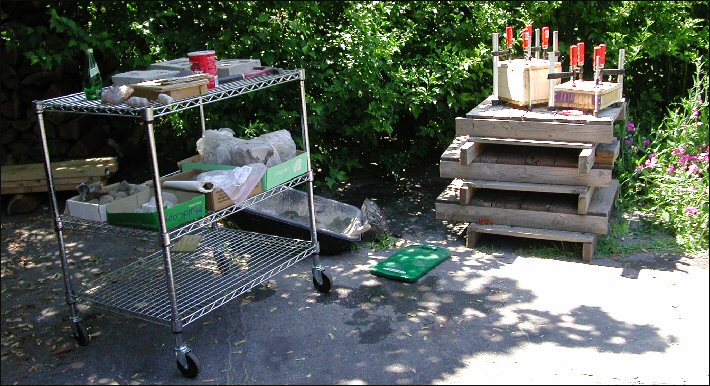 A photo of our outdoor work area at the end of the driveway. Notice the two setting cement sculptures--one in our original wooden form and another in the new larger-block wooden form. |
| |
| Click on each block in order to learn our thinking behind each block--what we were trying to accomplish, what the result was, and how this influenced our creation of the next block. |
 Block #1 |
 Block #2 |
 Block #3 |
 Block #4 |
 Block #5 |
 Block #6 |
 Block #7 |
Click on any sculpture or title for additional pictures and information. |
 Block #8 |
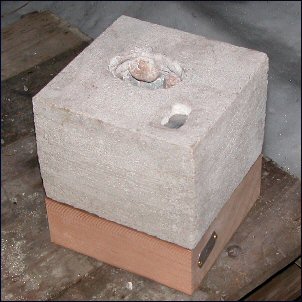 Block #9 |
 Block #10 |
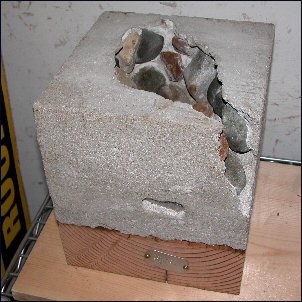 Block #11 |
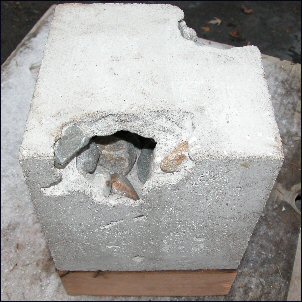 Block #12 |
 Block #13 |
 Block #14 |
| |
|
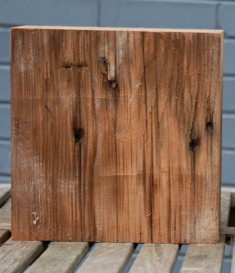
We thought our cement rock blocks deserved to be framed or "put on a pedestal." We liked looking at them sitting on our deck, but we like them even better when they were elevated and set-off by themselves. We got the idea that a simple thick wooden block would make a fitting pedestal. We also realized that putting something smoother and softer under the blocks would protect floors, tables, and other surfaces from being scratched up by the bottom of the cement blocks. Finding a solid piece of unfinished wood that was thick enough and interesting enough to pair up with our rough cement block sculptures proved to be a challenge.
The wooden bases we wound up using were cut from large wooden beams of slow growth Douglas-fir that had been used in an old Milwaukee Line Railroad roundhouse in Perry, Iowa. These thick 25-foot beams were salvaged from the building around 1982 by David Tousain and Charles Carpenter--Zen Buddhist monks living in rural Iowa. Our 11" x 11" x 3" wooden blocks were cut from these salvaged beams by David Tousain. These blocks by themselves have a lot of color, grain, and character and have been wonderul additions to our project--more than we had even hoped for. |
| |
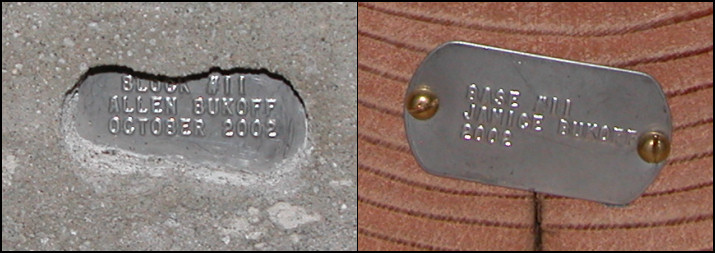
We got the idea that it would be nice to have a small metal plate with identifying information on each sculpture. We decided that dog tags would be the right size for this. We used the internet to find someone locally who would make us a set of two dog tags for each of our blocks--one tag for the cement block and one tag for the wooden-base pedestal. 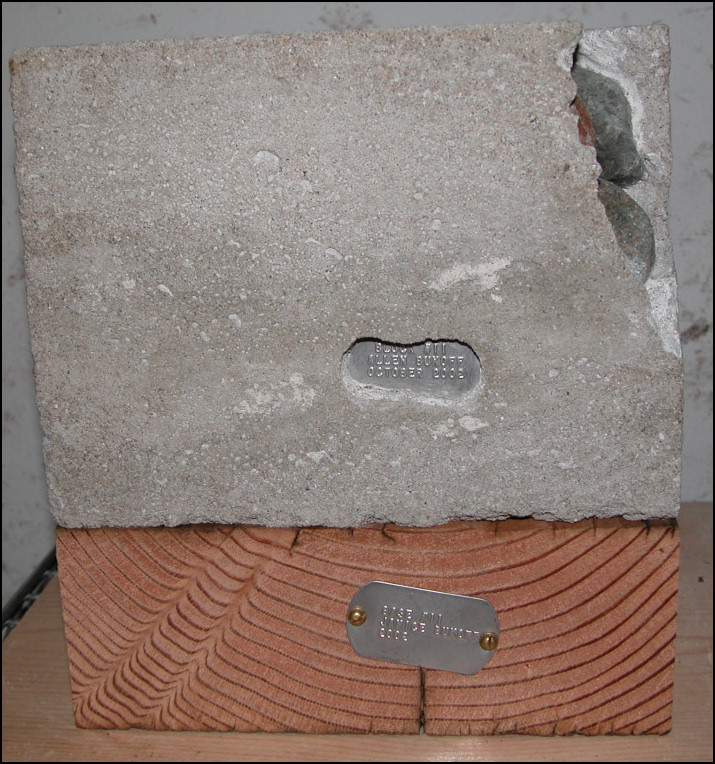
|
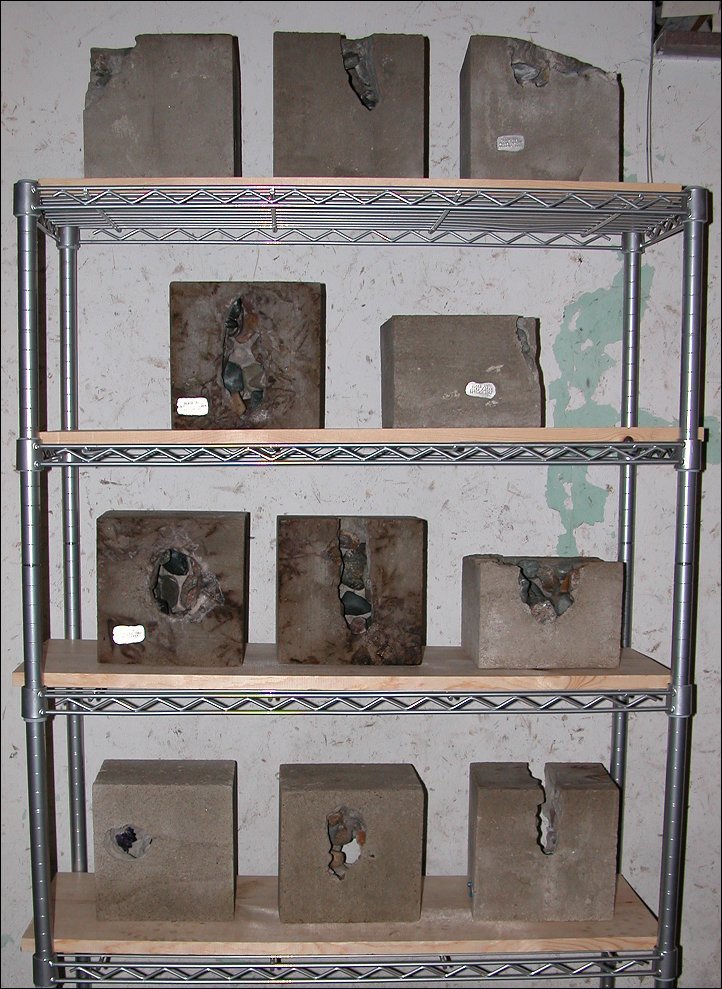
| Our cement block sculptures in storage before being distributed to their new homes. |
 |
Here's what I feel when I look at these blocks. Lots of dark-bluish serious slow FEELINGS (vs. the quick thoughts and jumpy energy that I get from most of the Fluxus/cognitive art I've done for years). I like the effect...fairly powerful and mysterious for me. The cavity in the smooth block is a mystery...a secret cave. A private place. It invites exploration. It's all on the INSIDE. It's a reversal of normal sculpture...which is exterior form...here the form is on the interior. The mystery is on the inside here. To me there's something very biological to the cavity and the rock-like polyps...it conjures up connections to my biology, to female biology, to health problems, and to death. These cement rock block sculptures give me slow serious feelings more than fast light thoughts.
None of this was what Janice and I had originally set out to do. These cement block sculptures with internal tunnels, caves, and crevices is what we had in mind when we set out to play around with cement and rocks. We have arrived at these cement block sculptures by creative accident--the kind of "accidents" revealed by taking an experimental and methodical approach while pursing some strong internal urge or desire whose expected goal keeps changing. Someday I would love to make a cement rock sculpture that's a ten-foot or bigger cube--maybe even big enough to crawl around in. I wonder what that would feel like!? |
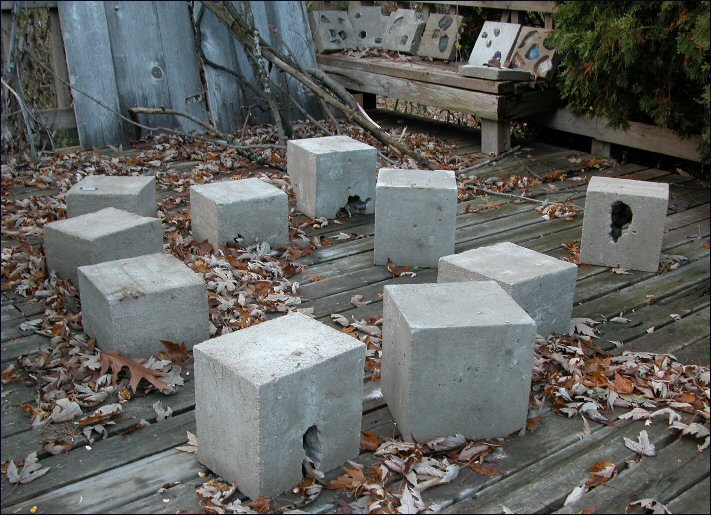 Cement blocks turned upside down on our deck to keep the rain and fall leaves out. |
We doubt it. |
|
Questions? Thoughts? Comments? Email allen@allenbukoff.com. |
 |
 |
 |
| © 2007 |